Brushing up our basics never harms us, since it gives us an incredible insight towards what makes us the photographer and much beyond. There always has to be a certain breakdown for any complex process for any creation, leave alone art or a photograph. When we keep ourselves fresh and rejuvenate our own inspirations, this will serve as a tremendous booster for our creations.
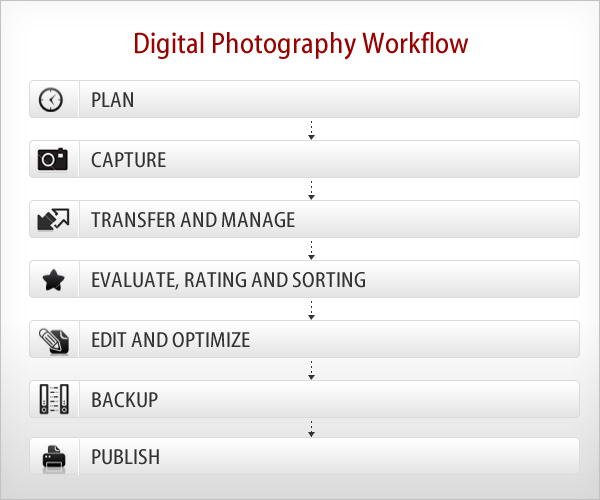
This article is such a one, which will help you regroup, re-enact, help you rise as a photographer and go beyond your aspirations. Simple step by step procedure towards perfection and masterful practice. Take a look at these words and an easy flow chart and keep tuning yourself thereby to find out where you shine and where you have been lacking as a photographer.

What is Digital Photography Workflow exactly? All we really want to do is take great pictures and reproduce them in the best way possible. But doing so actually involves a whole series of steps, from transferring the image files to a computer, to file naming, file format conversion, image optimization, and finally preparing images for printing or other forms of presentation.
Step 1: Plan
- Where, what, when, how and whom to shoot
- Checking, cleaning, and preparing equipment
- Take extra memory cards and backup camera
- Set everything up, charge the batteries for the cameras and flashes and pack the kit bag
- If you have some ideas about the shoot, take a notes and rough sketches
- Planning for how to store images securely until you can transfer them to your computer
Step 2: Capture
- Determining your best exposure and composition
- Measuring and setting white balance
- Positioning your subject(s), or positioning yourself in the right place to shoot
- Shoot raw, if possible. This provides the highest image quality and the most flexibility for image correction and interpretation
- Successfully execute the shoot
Step 3: Transfer and Manage
- Downloading from the memory card to a portable storage device or computer
- Logically and descriptively renaming and organizing photos for optimal accessibility
- Storing master files that are not modified
- Using metadata tagging
Step 4: Evaluate, Rating and Sorting
- After you make your photographs and transfer to your hard drives, the next thing to do is go through them, pick your favorites, and organize them into logical groups.
- Methodically go through each batch of photos and determine the ones that have the most potential. It’s easier to do this in several rounds of looking.
- Use the rating and labeling systems in your software to mark the ones that you like, for example give 5 Stars for the best photo, 1 Star for the average photo.
- Take some time to evaluate your rejected photos to figure out what went wrong. You can learn a lot more from your failures than from your success.
Step 5: Edit and Optimize
- Sometimes your photos will look great straight out the camera. Other times they will need serious work. But generally, all photographs (especially capture in RAW format) can use some processing to help them look their absolute best.
- Touch up images as needed like adjusting Levels, Image Crop, Sharpness, White Balance, Exposure, Shadow/Highlights, etc.
- In order to enable non-destructive image editing in Photoshop,
use and save layers, adjustment layers and smart objects
to master files. - Copy and convert images to any required sizes and formats.
- Add text and/or other graphics to images, as necessary.
Step 6: Backup
- Use multiple data backups (External Had Drive, DVD, Blu-ray Disc, Online Storage, etc.)
- Use a 3-2-1 backup (3 copies, 2 different media, 1 stored offsite) whenever possible.
- Clearly distinguish the primary and backup copies of your digital image files.
- Schedule system backups to occur at appropriate places in the workflow and image life cycle.
- Clone your system periodically to avoid lost time and lost data in the event of system drive failure.
- Please check this article to know more about Image Storage and Backup
Step 7: Publish
- The final step is Printing (Canvas, Albums as per client requirement)
- Uploading files to online galleries for display / for sales
Hope you guys like this article, Please give your feedback and further ideas in comment section.


