Guest Article By : Debashis Talukdar
Introduction
I started taking photographs with a point and shoot camera in 2000, and finally got my first digital SLR in 2006. It was a Canon 350D and admittedly, like most first time DSLR users, I really didn’t know what I was doing. Nor did I have a full appreciation for what the hardware that I had in my hands was capable of. I’ve since moved on to a Canon 1000D, and now shoot almost exclusively with a Canon 5D Mark II.
In 2008, I discovered what High Dynamic Range photography was. I shot a lot of HDR since. My first pieces were ordinary, and it wasn’t until I observed the work of several other very skilled photographers that I honed my skills. I still learn something new, and that is part and parcel of any artistic pursuit. HDR photography has become immensely popular. I wanted to take what I had learned with respect to HDR techniques, and extend it further.
With the increasing amount of video content on the Internet, I discovered that one could shoot time lapse with their DSLR. I set about trying my hand at it… with a few failures and lessons learned along the way. My frustration was that I hadn’t come across a single source where one would get all the information that they needed to put together a quality time-lapse sequence in a single location – and hence, decided to put one together.
I need to stress here that I didn’t invent time lapse photography (it’s been around for over 100 years), and was first used in a feature film in Georges Méliès’ motion picture Carrefour De L’Opera (1897). Even HDR time-lapse has been achieved as early as 2006. This is merely a single place where I have brought together the core techniques behind creating a time-lapse image.
What you Need
You’ll need the following in terms of camera hardware to put together a time-lapse sequence:
- A camera (it doesn’t have to be a Digital SLR); and
- A means to fire the camera at regular intervals. While one could do this manually using a manual cable release or wireless remote, an Intervalometer is the way to go to achieve steady triggering of your images. I generally recommend not triggering the camera but physically touching the camera body itself, as this is highly likely to introduce camera shake and consequently ruin the time-lapse sequence.
- A means to control the position of your camera. It’s important that you control the position of your camera. You will either want to keep it absolutely steady, or impart a regular motion (such as panning, or linear motion). In the case of the former, the most obvious thing to do is to mount your camera on a good sturdy tripod. If you are planning on imparting any sort of motion while shooting (such as panning or linear motion), a range of motorised rigs are available, or can be built relatively simply. Commercial rigs can tend to be expensive, though there are new solutions that are appearing every day.
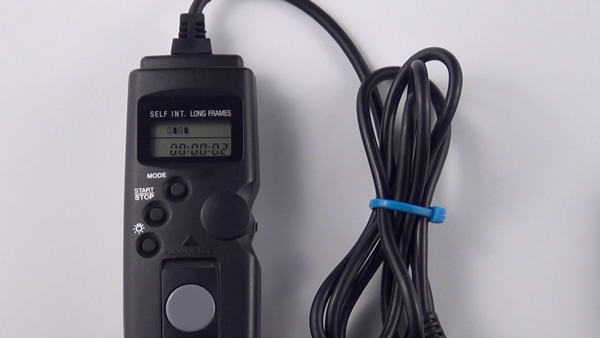
One could theoretically shoot with a video camera and speed up the footage in software – but the effects that one achieves using such a technique are quite different from the effects achieved by shooting a series of frames with a still camera and assembling them into a time-lapse sequence.
You will need the following in terms of software to put together your time-lapse sequence.
- An image editor. I use Adobe Photoshop; though you could use Corel PaintShop Pro, Adobe Photoshop Elements, Adobe Lightroom, Gimp, or a myriad of other photo editors out there;
- A video editing application to combine your images into a time-lapse sequence. I use Corel Video Studio Pro, though other solutions include Adobe Lightroom, Adobe Premier, iMovie, Final Cut Pro and Pinnacle Studio.
The Math Behind the Magic
Before shooting, one needs to understand the math behind creating time-lapse sequences.
Time-lapse photography can be considered the opposite of high speed photography or slow motion. Processes that would normally appear subtle to the human eye, e.g. the motion of the sun and stars in the sky, become very pronounced. It is the extreme version of the cinematography technique of under cranking.
The math behind time-lapse depends on the frame rate of the video that you are creating. The greater the frame rate, the more frequently one will need to shoot for a video of the same length. Most time lapse sequences are produced to run at between 24 to 30 frames per second (fps). For our purpose, we will use the example of a video sequence being created at 25fps. That means that 1 frame = 1/25th of a second.
By that logic, 1 second of video footage will require 25 shots! (Now is a good time to start thinking about your shutter speeds and intervals.)
If you are shooting 1 frame every 3 seconds,
a 4 second time-lapse video clip will require 4 × 25 = 100 shots. At 1 shot every 3 second, 100 shots will take 3 × 100 = 300 seconds (or 5 minutes); i.e. a 4-second time-lapse sequence will require 5 minutes of shooting time when shot at 1 second intervals.
Your choice of interval depends on the subjects that you choose to shoot.
- Crowds of people work well when photographed at intervals between 1 and 5 seconds;
- Stars work well when photographed at intervals between 30 to 90 seconds;
- Fast growing plants need only be photographed every 5 minutes; while
- Decaying fruit need only be photographed every 30 minutes.
By that logic, 10 second clip at 25 frames per second will require 250 shots which will require…
- For People (1 second interval) a shooting time of 4 minutes and 10 seconds.
- Stars at (30 second intervals) a shooting time of 2 Hours and 5 Minutes.
- Fast growing Plant (5 minute intervals) a shooting time of 20 hours and 50 minutes!
- Decaying fruit (30 minute intervals) a shooting time of 5 days and 5 hours!!
Step1: Take some images
Before you can create a time-lapse sequence, you must have a sequence of images to work with. I recommend choosing an area which has a dominant stationery component with lots of moving elements within. Examples of such areas are shopping malls, busy streets, a construction project, children solving a jig-saw puzzle, or landscapes on days when there is a lot of cloud activity.
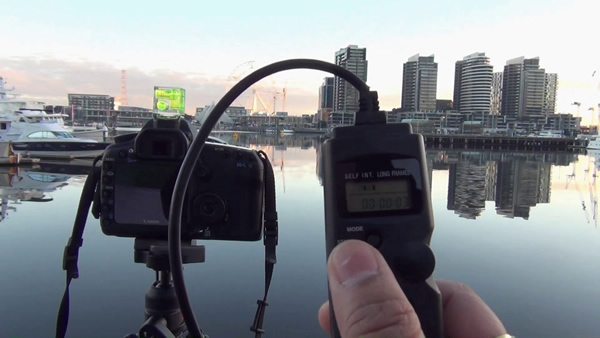
Like all types of photography, the principles of photograph continue to apply with time-lapse photography. It’s important to compose your image correctly as best as possible to minimise any work that you need to undertake in post processing.
Once you’re all set up, ascertain what your correct exposure and shutter speed settings are. Once you’ve ascertained this, it’s time to program your intervalometer. You want to be the interval on your intervalometer to be just slightly larger than the shutter speed. For example, if the shutter speed on your camera is under 1 second, you would want to set the intervalometer to shoot every second. For subjects where your shutter speed is, for example, 3.2 seconds, you might look for an interval of 4 or 5 seconds.
The interval that you choose should be greater than the sum of:
- The exposure time or shutter speed, and
- the time that the camera requires to write the data to the memory card. (If you’re using a fast memory card, this should typically no more than 1 second).
Always shoot in RAW (unless your camera doesn’t allow you to).
Once you’ve chosen your interval, you need to decide how long you want your time-lapse sequence to be, based on the previous section. Based on your decision, start and complete shooting your sequence by activating the intervalometer.
Step2: Copying the images to your machine and batch renaming them
Once you’ve copied your images from your camera’s memory card to your hard drive, it’s time to rename them in chronological order.

I used Adobe Bridge to do this, and rename my images with the naming convention “yyyymmdd_xxxx.ext” where “yyyy” is the four digit year, “mm” is the two digit month, “dd” is the two digit date, and “xxxx” is the sequence number.
Step3: Tag your images, apply basic image corrections and save them as JPEG
The first part of this step (where I recommend tagging all your images with relevant keywords) is optional, though I recommend it for most photographers, as there may be a time when you want to go back to your image sequence and create a still image from a single frame. I do all my meta-tagging of my images in Bridge, though you can do so in Lightroom, PaintShop Pro, and a range of other applications.
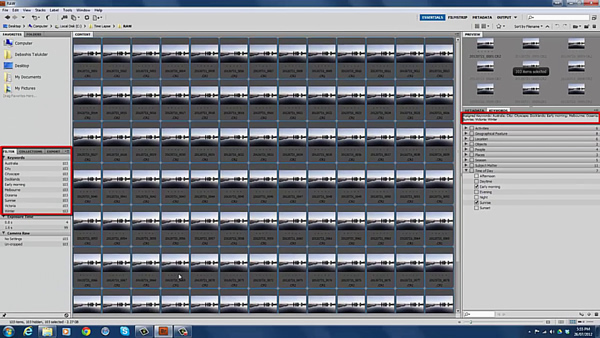
The next (essential) part is to open all the images are a batch in Adobe RAW, and apply some basic corrections. The corrections that I recommend at a minimum are:
- Lens correction, to fix any lens aberration; and
- Correcting the horizon line (this is a pet peeve of mine when I see landscape shots).
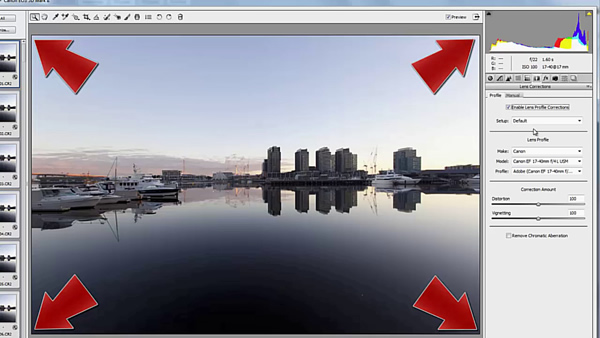
Other corrections that you might choose to do are:
- White balance correction;
- Hue and Saturation;
- Clarity and Vibrance;
- Selective colour adjustment.
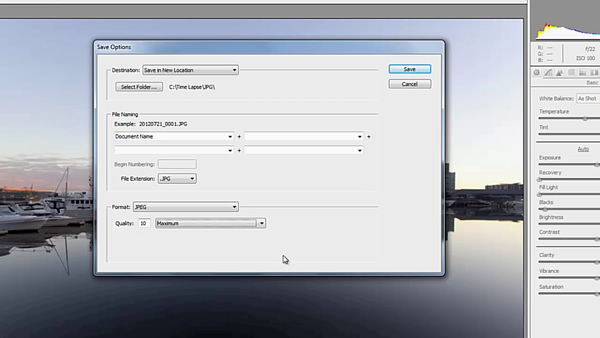
Once again, Photoshop is my tool of choice (I do all of this in Adobe Photoshop’s RAW converter interface), but am aware that there are a range of applications that will allow you to do this.
Once you’ve applied all your corrections to the entire sequence of images, save them as JPEGs in a separate folder in full quality.
Step4: Create the Time-Lapse sequence
At this stage, we have a series of JPEG images that we are happy with to create our time-lapse sequence with. It’s now time to create the time sequence.
To do this, I use Corel Video Studio Pro. As mentioned before, there are a range of applications that will perform similar functions – but I just happen to find Corel Video Studio Pro as the best solution for my purpose.
To create your time-lapse sequence, start from a new video project in Corel Video Studio Pro.
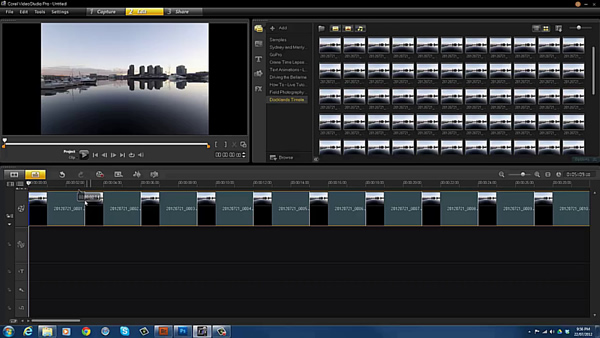
Load all the JPEG images that you created in the previous step into the timeline of your video project, and then alter their duration to 1 frame per image. Once done, render the sequence to a video format of your choice (I recommend using MP4 as it is the current ubiquitous standard for distribution of digital media, and works well with a range of mobile devices, internet applications, and distribution services). You’ve now created your time-lapse sequence.
Step5: Save your video project
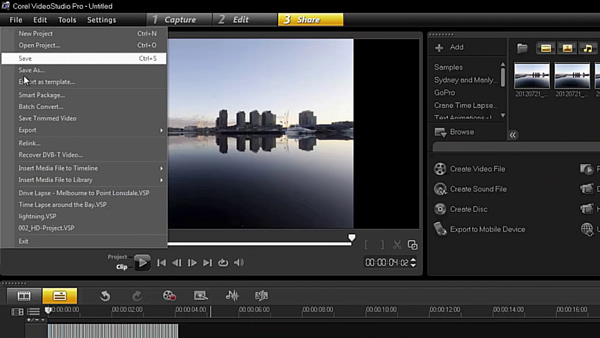
This is the part where we seem to forget something important in our excitement. Always remember to save your project in the application native format of your video editor. In Corel Video Studio Pro, save the project as a VSP file so that you can come back and use it in future for other projects, or to add any effects.
This is an introductory tutorial and will always be available free of charge.
Watch Video
You will need a password to access it. The Password is CaughtInTime
The Basic Time Lapse Photography Tutorial from Debashis Talukdar on Vimeo.
I have an advanced tutorial that is underway, wherein I will cover the following and more in detail:
- The planning involved behind putting together a time-lapse video;
- The use of creative filters in time lapse sequences to add a sense of mystery and surrealism;
- Adding stunning professional transitions to your time-lapse sequence;
- Introducing zooming and panning using software solutions to add life into your time-lapse sequences;
- Adding motion into your time-lapse sequences by using a hardware solution to introduce the illusion of movement;
- Spicing up your time-lapse component images using post-processing techniques in your photo-editor of choice;
- Removing noise and distractions in your time-lapse sequence;
- Adding a soundtrack to add another dimension of life into your time-lapse sequences and resources from where you can use musical scores in your time-lapse sequences;
- Producing and sharing your time-lapse sequences with friends, family and well-wishers;
- Raw image content for you to start practise putting your own time-lapse sequence together.
If you’re interested in how it comes along,

